Do you want your deck to look as good as possible, along with improving its longevity? Then look no further, because Thompson water seal is everything you will ever need to make your deck look awesome.
Perhaps you want to prevent your deck from cracking or splitting. Whatever the reason might be, the Thompson water sealer is a great solution to prevent damage from your deck.
Here, you will learn how to apply Thompson water sealer to protect your deck from damage and make it as durable as possible.
Benefits of Using Thompson’s Water Seal
Thompson’s water seal has been in the market for a very long time, and it’s proven to be a great and reliable product to seal your wood.
Here are a few things that you should know about this product before you start applying it on your deck.
1. Makes Redecorating Easier

Sometimes your old and favorite room needs an update to make it look brand new again. Thompson’s water seal has a wide variety of colors to choose from. From natural colors to five tinted shades.
2. Seals Out the Water Right from the Start
Thompson’s water seal is known for its high levels of waterproofing, and the ability to clean and treat in one single day because you can apply it to damp wood.
3. Low Odor
If you've ever used any type of sealer, you know just how annoying it is to work with. The odor can make you feel sick and not want to use it.
This is where Thompson’s water seal comes in handy. Its low odor makes it a great product to work with since you don’t have to worry about the odor transferring into your curtains. Nonetheless, you should still wear a dust mask when using it.
4. Works Great Against Mildew
Dampness usually results in the growth of mildew on deck surfaces. It can easily ruin your deck appearance as it makes it look old and scuffed up.
The coating pretty much protects your deck from both mildew and UV damage. So, now you don’t have to worry about mildew ruining your deck.
5. Drying
Immediately after installation, Thompson water seal does not dry if you pour water into it since the sealer is still vulnerable. So, when you’re done applying it, you should avoid spilling water on it as well as prevent heavy downpours of water from getting into the wood.
6. Long-lasting
It is resistant enough to last for about 10 years and still maintains its natural color, unlike many other sealers.
7. Works on Treated Wood
Thompson’s water seal also allows you to apply it to new pressure treated wood after you’ve cleaned it.
How to Use Thompson Water Sealer: 6 Steps
Renewing your deck every now and then gets expensive over time. So, it’s important to establish a routine of upkeep to protect your deck and extend its longevity for years to come.
Thompson water sealer is a great solution to protect your deck, driveways, or fences from damage, as well as adding color to it if needed.
It is also quite helpful during the rainy season as it will protect your deck from water damage. Plus, it’s really easy to apply even if you’ve never applied any sort of sealer on your wood.
Step 1: Prepare Your Workspace

Before getting started, you need to clean your workspace. This will increase your productivity when applying the sealer for the first time. After all, nobody wants to work in a messy environment. Remember that your productivity is shaped by your surroundings.
Step 2: Clean the Surface
You should clean your wood’s surface before applying Thompson’s water seal. This will prevent the paint pad from getting clogged when using it. So, you must take the time and clean the surface before doing so.
Things You Will Need
- A microfiber cloth or a rag to clean the surface
- Water to dampen the microfiber or the rag
Steps to Take
- Dampen the rag or the microfiber.
- Rub the microfiber against the surface back and forth.
- Let the surface dry.
Step 3: Cleaning an Unfinished Wood
Use a dry microfiber cloth or rag to clean the surface. Keep in mind that using a damp microfiber cloth to clean the surface of an unfinished wood could warp.
Add a drop of water on the surface to determine whether your wood is finished or unfinished. If it absorbs and leaves a mark, then it's unfinished.
Steps to Take
- Rub the microfiber cloth against the surface back and forth.
- Keep doing this until there is no dust residue left.
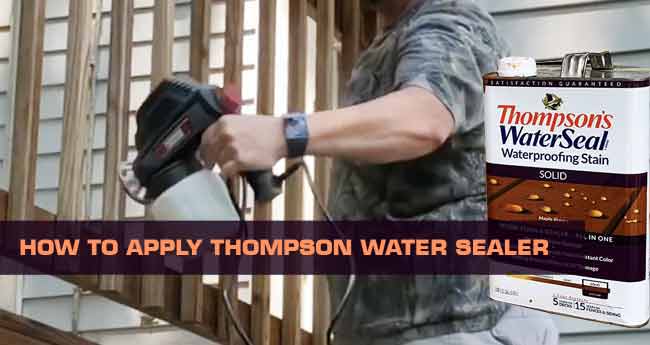
Step 4: Applying Thompson’s Water Seal
It’s up to you whether you want to use a sprayer or a paint pad. Although, if you read the back of the can, it says that they recommend using a garden sprayer for applying the sealer.
Things You Will Need
- Thompson’s water seal
- A garden sprayer to apply the sealer
- Long sleeves, pants, glasses, and safety glasses to prevent chemicals from getting into your skin
Steps to Take
- Put on your protective gear before you apply Thompson water seal with sprayer.
- Take off the plunger tube.
- Mix the product well and then fill the spray can with Thompson’s water seal.
- Replace the plunger tube.
- Slightly tighten it down until you feel resistance. Do not overtighten it.
- Now you need to depress and release the plunger.
- Pump it up until you feel resistance.
- Do not over pump once you’ve felt resistance.
- Spray Thompson water seal all over your deck.
- Now let it dry. This may take up to 24 hours before the deck thoroughly dries.
Step 5: Using a Paint Pad
So far, we’ve only shown you way to apply Thompson’s water seal with a sprayer. However, depending on the project, you may want to use a paint pad, sprayer or roller to apply your product.
Using a sprayer is the fastest way to get the job done, but if you don’t want to spend money on a sprayer, you can always use a roller or a paint pad, and you still will be fine.
Things You Will Need
- A paint pad to soak it into the sealer
- Thompson’s water seal
Steps to Take
- Pour the sealer into a deck.
- Dip the paint pad into the seal.
- Bring the seal onto the tray area.
- Start at one corner and work from one end to another.
- Apply the sealer parallel to the deck boards.
- Now allow the deck to thoroughly dry. Thompson water seal dry time takes about 24 hours to dry thoroughly. Also, make sure you don’t spill any water on it since the sealer is still vulnerable.
Step 6: Drying Times
Give it at least 24 hours to dry thoroughly. Depending on the weather, drying time may vary. If you want to apply latex paint over it—you should give it at least 45 days before doing so.
Process To Apply Thompson Water Seal with a Paint Roller?
Sun and rain can potentially ruin your deck, so applying it to your deck plays a major role in extending its longevity for as long as possible.
So far, we’ve only shown you how to apply Thompson’s water sealer using a sprayer. Not all of us have a sprayer at home, so using a sprayer might not be the easiest method for you.
You can use a roller if you don’t want to use a sprayer, and you still get the same result. So, it’s a win-win at the end of the day.
Clean the Deck

Before you get your hands dirty, you must clean the deck to ensure there isn’t any dirt when you start applying Thompson’s water seal.
Things You Will Need
- Get a concentrated dish soap
- A hard brush
Steps to Take
- Remove everything from the deck.
- Spray off all the leaves and gunk that’s on the top.
- Spray the dish soap all over the deck.
- Now start scrubbing with a hard brush.
- Rinse it off and let it dry.
Apply the Sealer
Now that you have cleaned your deck, it’s time to apply the sealer. You must carefully follow the instructions step-by-step to get to the final result.
Things you will need
- A paint roller
- A roller tray
Steps to Take
- Pour the seal into the roller tray.
- Dip the roller into the paint.
- Roll it backward and forwards on the roller tray to distribute the seal evenly.
- Start at the center of the area.
- Now work from one end to another end.
- Do not apply too much pressure as this could lead to an uneven coat.
- Keep doing this until you cover the whole area.
- Let the deck dry, this could take up to 24 hours.
Tips to Keep Your Deck Looking As Good As Possible
Since you’ve spent some time sealing your wood, it is also a great idea to take some time and learn how to keep your wood looking as good as possible.
Just because you applied a sealer to your deck doesn’t mean that you can set it on fire. So, here are some tips to help you maintain your deck for years to come.
Be Careful How You Place Furniture Covers
One of the main things that you want to keep in mind when thinking about maintaining your wood is that you should be careful when placing furniture covers, so they can’t trap moisture.
Move Your Plants Back
If you want to prevent both mold and mildew from your deck, then you should move your plants back from your deck edges.
Sweep Regularly to Prevent Mold
You need to sweep regularly to remove mold spores from your deck. Doing this quite frequently will stop the spores from growing as well as prevent other dormant spores.
Don’t Use Bleach on Your Deck

Bleach is by no means a great wood cleaner. It doesn’t even remove some of the dirt in the wood. Bleach could severely damage the wood fibers, so avoid using it on your deck. If you want to clean your wood, then you should stick with cleaners that are specifically designed for wood.
Final Words
As you can see, learning how to apply Thompson water sealer is quite easy as long as you follow our guide step-by-step and have the right gear.
Even if you don't want to buy a garden sprayer, you can still use plenty of other tools. Paint rollers, paint pads, and brushes should still work just fine when you apply Thompson's water seal.
Thompson’s water seal dries fairly quickly compared to other sealers, but that doesn’t mean that you can walk on your deck right away after sealing it, so keep that in mind.

- How to Choose Wood Filament: A Complete Guide - July 17, 2021
- 10 Best Propane Forge Reviews - June 30, 2021
- Best Circular Saw Blade for Plywood : Top 10 Picks - June 30, 2021
Thank you so much for your great information, can’t wait to see the end result.
Our pleasure. 🙂
Can you apply in hot temps, +30*c or higher?
Can you apply with foam roller?
Yes, you can. 🙂
Best is sprayer.
Hi! I am hoping to use Thompson’s clear water seal on my painted outdoor chair. Will it adhere to a painted surface?
Is brush a good tool to apply the seal. You’ve not mentioned it, but I ended up buying one. Though I don’t want bristle marks on my chair.
Thank you!
1. Yes, it will adhere to a painted surface.
2. We suggest sprayer. You can check here.
After applying Thompson water seal when can you walk on it? Do you have to wait the 24 hours?
For best results, wait 24 hours before walking on it after applying the water seal.
Hello. I am living in the Pacific Northwest :
1) Will a second coat be recommended? If so how long do I have to wait before applying a second coat?
2) I have been sanding my cedar deck!and planning to stain and seal it. There are some cracks in tue boards due to the weather and also there are some indents into the wood where screws are. Some screws go deep under the surface of the deck. Is it recommended to fill all those holes and cracks with wood filler before applying the Thomson stain and sealer?
Hello,
1. Thompson’s WaterSeal products typically need only one application, but you can apply a second coat of stain to darken the wood, if desired. However, you must wait for the first coat to dry (typically about 2 hours) and apply the second coat within 4 hours of applying the first coat.
2. Yes, I would recommend to first fill those holes and cracks before applying sealer.
Can Thompson water seal be applied with an airless sprayer
It is not recommended to spray up Thomson water seal other than with a pump up garden sprayer. I don’t think it would hurt(unless you didn’t clean it properly afterwards) your airless sprayer to use it to spray Thompson’s. But more importantly, would it hurt the Thompsons? Possibly. I don’t know this for sure, but I think the minimum pressure an airless sprayer is gonna push out is capable of shearing this product into a less-than-optimum performance. That’s not to say it will – but the manufacturer doesn’t recommend it, so I wouldn’t.
I used clear TWS on my cedar garden beds. I want to re apply using the “natural cedar” TWS to add some colour since it has turned out looking too white. It has been three years so can I just apply the new coat over the old one?
Yes, as it has been 3 years you can apply the new coat over the old one.
I have a potting bench I just bought that needs to be assembled. Is it better to seal it before
or after assembling it? Thanks
Hi, I would recommend to seal before ssembly. Sealing first ensures complete coverage, especially in hard-to-reach areas.
thank you so much.. i have a new wooden outdoor bench. now i know to seal it before assembly and that i can pretty much apply with any tool preference. can’t wait to begin.