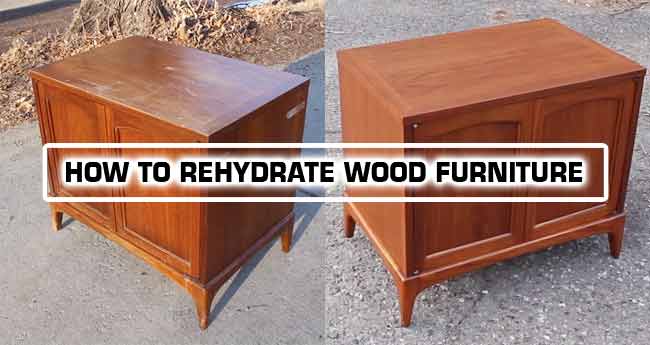
Want to fix your furniture’s appearance? Then, you need to rehydrate your wood furniture and give it a new look. We know that the rough texture and rustic feel of wood make it look old and scuffed up.
Perhaps you want to apply a finish on your old wood furniture. So, you try to clean it, but the fuzzy spots just don’t wash off with water.
When you try to restore old wood furniture —you can’t just clean it. You need to go through a couple of methods before you get to that point.
Here, you will learn how to rehydrate wood furniture. You will also learn how to prevent the wood from getting scuffed up and what causes it.
How to Restore Your Old Wood Furniture?
It’s time to restore your old wood furniture. As bad as it may look, there is still hope for you. You’ll need to paint and sand it, but before you do anything. There are a couple of things that you need to get done before you try to restore your wood furniture.
We’ll walk you through a couple of methods. That will teach you how to get your old and scuffed up wood furniture back to its original look.
1. Sand Your Wood
The reason we sand is to smooth the wood, level the wood, and fix imperfections such as bubbles and marks.
Things You Will Need
- Sandpaper
Steps to Take
- Wear a dust mask and glasses.
- Fold the sandpaper.
- Rub the sandpaper back and forth against the grain.
- Brush the dust away.
- Repeat until the surface is smooth to the touch.
2. Applying Boiled Linseed Oil

Boiled linseed oil brings out all those natural colors. It also leaves a very smooth touch on the surface and makes it look just like it did back when you first bought it.
Things You Will Need:
- Boiled linseed oil
- A rag to rub the boiled linseed oil
- Gloves to protect your hands
Steps to Take:
- Wear a pair of gloves.
- Pour boiled linseed oil onto the wood.
- Use a rag to rub it back and forth.
- Make sure you cover the whole surface.
- Let it dry for about 20 minutes. If you don’t, the finish won’t be as effective.
- By now, the boiled linseed oil should start to soak in.
- Use your rag again to distribute it evenly.
- Use a clean rag and wipe off any excess oil.
- Let it dry — this process will take about 3 days. The boiled linseed oil will set into the wood.
- Before applying the third coat, use a clean rag and brush off any dust from the wood’s surface.
- Use small amount of oil this time.
- Rub the oil on the wood using a rag.
- Set a timer and let it dry for about 20 minutes.
- Once again, use a clean rag to wipe off any extra oil.
- Reapply some boiled linseed oil when you finish wiping off any extra oil.
- Rub it back and forth until the oil starts to soak in.
- Toss the used rag into a separate metal can and then fill it with water to prevent the rag from catching on fire.
3. Painting Over Oil
You can paint over the oil you just applied. But before you do that, you need to let it dry. Feel the surface of your wood, if it still feels tacky. You shouldn’t paint it as it’s too early to paint.
Steps to Take
- Protect your floor from paint and sawdust.
- Remove any hardware you have on your furniture before painting.
- Keep windows open to ventilate the room if you’re painting inside.
- Brush off any dust.
- Prepare the brush by soaking it.
- Tip-off any drips.
- Apply the paint.
- Flex the brush on the surface.
- Stroke smoothly away.
- Follow the manufacturer’s instructions for drying times.
Tips to Prevent Wood from Drying

When wood is exposed to water, the liquid is absorbed by the wood, which may lead to one part of the wood drying faster than the other. And, that could cause the wood to warp.
This is why it is essential to wipe off any water on your wood furniture to prevent this from happening. Although sometimes this is harder to stop. You never know when a heavy downpour of rain could get into your wood.
1. Let Your Wood Furniture Dry
The easiest way to prevent your wood from drying is to wipe off the water you spilled on your dinner table before the water starts to soak in.
- Get a rag.
- Wipe the water off as soon as possible.
- Do not leave the wood furniture outside — moisture could make things a lot worse.
- Keep an eye on it.
- This process may take up to 24 hours.
2. Sanding the Wood Furniture
If you want to protect your wood furniture, there are a few things you need to do, such as sealing it to protect the wood from water. But before we do that, we need to sand the wood.
Let the wood dry. If there is water on the surface, your sandpaper could get clogged up with residue.
Steps to Take:
- Wear a protective mask and safety glasses before sanding.
- If you can, get a sanding block — this will make sanding easier. But if you don’t want to go through all that hassle, you can just fold the piece of sandpaper.
- Rub the sandpaper back and forth.
- Sand along the grain.
- Brush the accumulated dust.
- By now, the wood should be very smooth to the touch.
3. Seal Your Wood
Sealing wood is a common technique to enhance its appearance and protect it from water. The sealer penetrates the wood. And then, the sealer creates a protective layer that reduces water infiltration. But that does not make the wood waterproof.
Choose a Sealerl:
There are 2 types of sealers - oil-based sealers and water-based sealers. Let's go over the differences to help you choose the perfect sealer for your project.
Oil-based Sealers:
- Offers excellent protection
- Cheaper than water-based ones
- Strong odor
- Slightly more durable than water-based
- Adds color to your wood over time
- Can take several days to dry and cure
Water-based Sealers:
- Offers decent protection
- Mild odor
- Low toxicity
- Does not add color to the wood and will preserve its natural tone
- Dries faster than oil-based
So now that we know the differences between oil-based sealers and water-based sealers, it's time to start applying the sealer.
Steps to Take:
- It is vital to protect the surface below against splashes. Splashes can permanently stay in the wood.
- Dip the bristles, but do not dip the bristles deeper than a third of its length into the paint.
- Tip-off any drips.
- Paint along the grain.
- Take the brush away from the edge of the wood to prevent runs.
- Keep doing this until you seal the whole wood furniture.
- Let it dry.
- Depending on the sealer you used, this process can take some time.
- For oil-based, it’s about 48 hours, and for water-based, it’s about 6 hours.
Conclusion

Restoring your wood furniture is not as hard if you take the time to do so. Simply sanding the wood, applying linseed oil, and painting should be enough to restore your old and scuffed up wood furniture.
But you also need to maintain it to prevent this from happening again. Avoid spilling water on it, but if you do, wipe it off immediately. Don’t leave it outside as a heavy downpour of rain could easily ruin your wood furniture.
Sealing is also a great technique to protect your wood from moisture. It makes the wood water-resistance but not waterproof. As you can see, restoring your old wood furniture is quite simple, and now you don't have to throw it away.

- How to Choose Wood Filament: A Complete Guide - July 17, 2021
- 10 Best Propane Forge Reviews - June 30, 2021
- Best Circular Saw Blade for Plywood : Top 10 Picks - June 30, 2021
If I put the oil inside a drawer, how long should I wait before putting clothes in?
Hello,
I would suggest you wait at least 3 days for the oil to dry before putting clothes in.